

Showing posts with label frosting. Show all posts
Showing posts with label frosting. Show all posts
Monday, December 3, 2012
Pumpkin Whoopie Pies
It's been an interesting month here for me at casa Baking and Mistaking. I semi-dealt with a superstorm, had a semi-vacation and survived a semi-war. And what better way to deal with everything than baking - specifically, pumpkin whoopie pies with cinnamon cream cheese frosting?

Thursday, September 13, 2012
Vegan Chocolate Chocolate Cupcakes
I'm not a vegan. Not even close. But I do run out of eggs sometimes, and I do like to stretch my baking horizons. These vegan chocolate cupcakes are easy and delicious - you won't miss eggs or milk - or even butter - at all!


Monday, June 20, 2011
Carrot Ginger Cupcakes with Cinnamon Cream Cheese Frosting
While I'm not sure I'm quite sold on the cupcake 'craze' right now (I'm much happier knowing pie is the next big thing) I can appreciate the many conveniences of mini cakes. Firstly, the higher frosting to cake ratio. No-brainer. Second, the portability. Third, the ability to eat 3 of them and pretend it is still a snack.


Monday, December 27, 2010
Melting Snowman Cookies
There was a time in my life, where I looked forward with glee to snow days. Snow days meant sleeping late, missing school, sitting inside in my pajamas, watching bad movies and seeing the snow plows drive by. Unfortunately today I am an adult older, and huge snowfalls means canceled plans, missing work, commuting woes and other unpleasant things. In fact, I think it's safe to say, that I don't really like snow at all anymore. Except, perhaps, when it comes in uber-adorable cookie form.


Thursday, December 16, 2010
Pumpkin Cupcakes with Cinnamon Cream Cheese Frosting
After I cracked open, disemboweled, cooked and pureed my 5-pound pumpkin, I made pumpkin muffins, pumpkin soup...and still had pumpkin puree to go. So I searched high and low, for the perfect recipe to highlight the remainder of my fresh pumpkin puree. And I found it, in these pumpkin cupcakes with cinnamon cream cheese frosting.


Tuesday, September 28, 2010
Red Velvet Cupcakes with Cream Cheese Frosting
I know I'm well behind the red velvet craze, but I never quite saw the appeal. From what I understood, red velvet cake is a chocolate flavored cake that is colored red. (Yes, yes, I know that original red velvet cakes needed no food coloring.) But, since I'm a generally curious person, especially when it comes to things like cupcakes, I thought I would give them a shot.


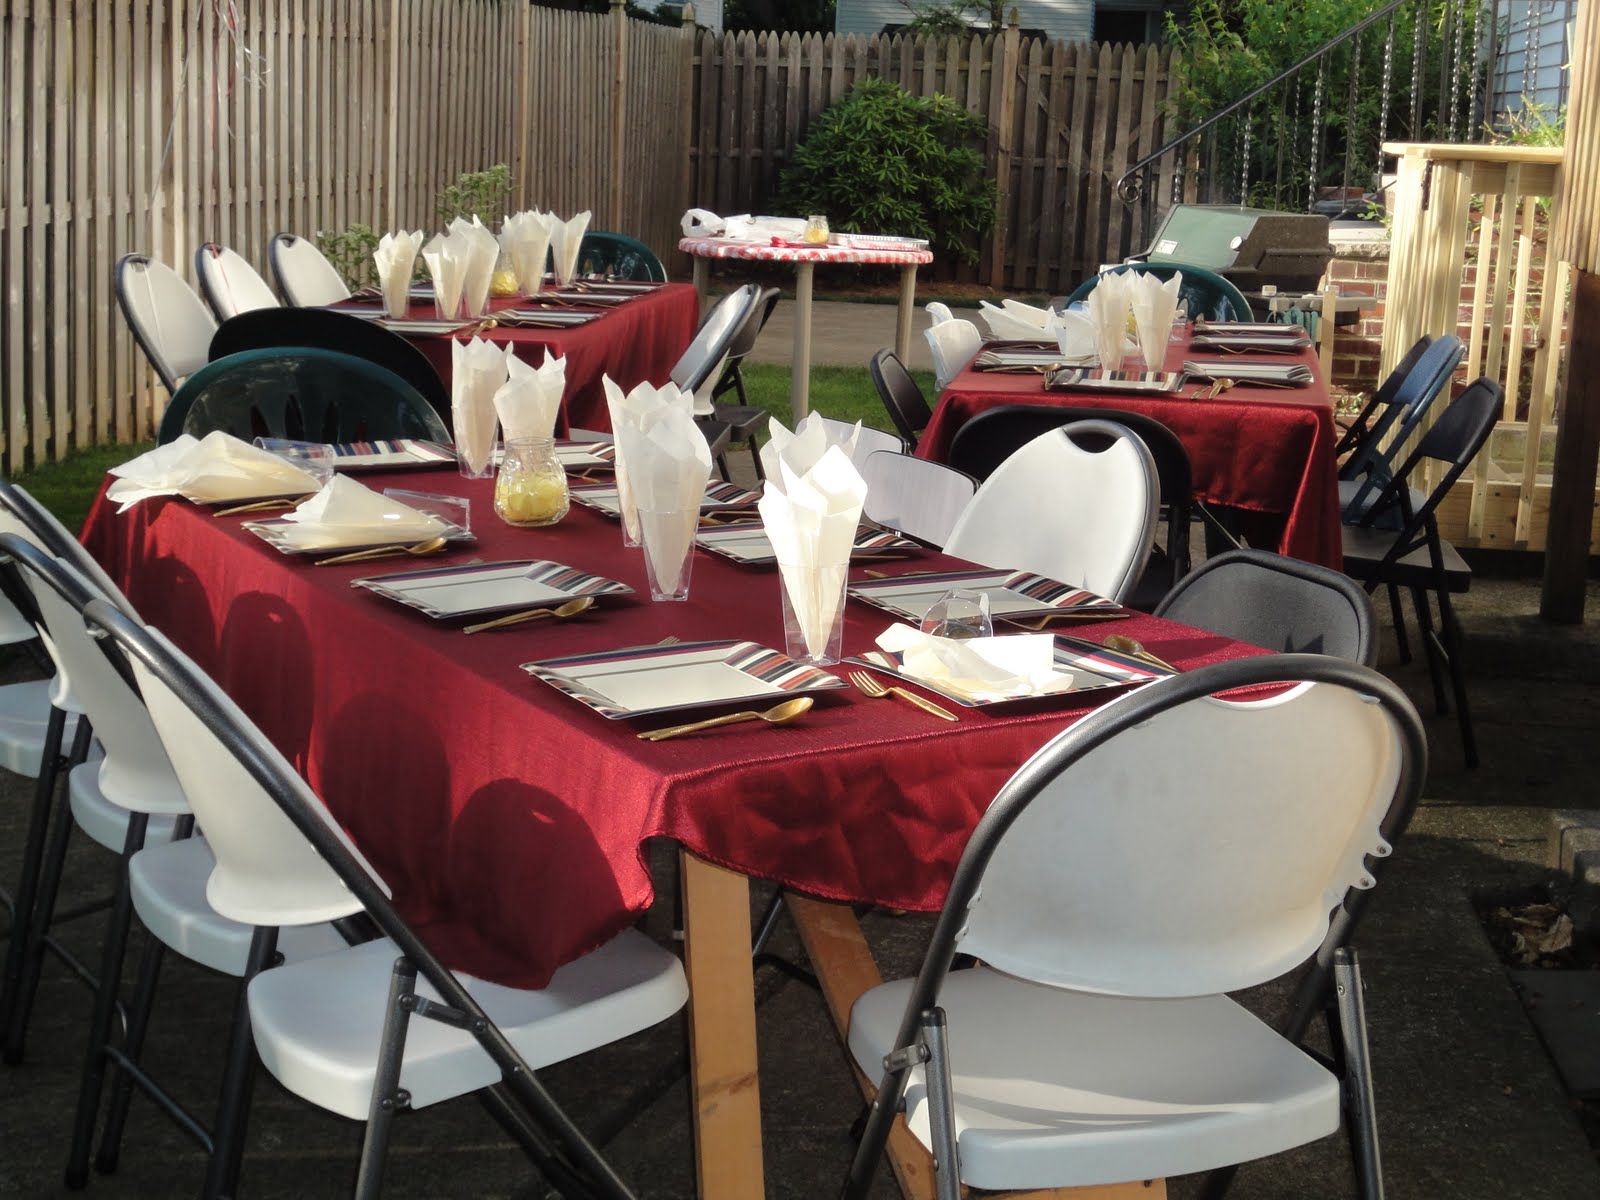
Monday, July 12, 2010
Party All The Time
Ah here I am, back in control, just the way it should be. After temporarily (and partially) seceding the controls last week, I've once again regained power. On to the food!
Today I'm going to tell you about a party I held a couple weeks ago in my backyard. You see, after oh so many celebrations, Shaya and Racheli got married. And, in Jewish tradition, the partying continues every night for a week after the wedding.
Welcome to the barbecue.
 We went with the standards - hot dogs, hamburgers, chicken; rice, potato salad, and a host of other salads - and lest you think I tackled this all by my lonesome, I had plenty of help.
But, back to what you're really here for - dessert. The requisite watermelon, of course, plus other fruit, pink-tinted rice krispie treats and mini peach cobblers provided by someone else, plus I made my classic chocolate chip cookies (though with some minor, but still edible screw-ups).
PLUS - Mini-sprinkle cupcakes:
After waxing-poetic about my new mini muffin pan that I reappropriated for tartlets, I finally put it to use for adorable tiny cupcakes.
 I'm sure they make mini cupcake liners, but I didn't have any, and I wasn't too worried about sticking, and I thought no liners would make them easier to eat, and I was always told to never write a run on sentence. Ha, good thing school is over for me.
 I certainly have more things in store for that pan - especially after my mother, who apparently reads this thing, bought me my very own tart shaper! Speaking of, she was also the guest photographer at this event, as I ran around worrying about things. Teamwork!
Anyway, up next on the menu: individual chocolate mousse cups.
 To be honest I'm not really the biggest fan of chocolate mousse - but I thought it would be cute, easy and popular. And it was. The recipe is, in the words of my least-favorite Food Network personality, "super simple" with two ingredients. Then I just divided it into little cups, and topped with whipped cream right before serving.
 Tada!
Tada!
Tip of the Day: Chocolate mousse is indeed easy, but there are a few tips that are crucial to it's success. One is the tempering of the yolks - if you add all the melted chocolate at once you run the risk of "cooking" the yolks - and have scrambled egg mousse. Adding a bit at first brings their temperature up before mixing in the rest. Another crucial point is the folding of the egg whites as supposed to mixing - use a spatula to cut and lift the mixture, folding it over itself over again until combined - but we careful not to stir it, you'll deflate the lightness of the whipped egg whites.
Recipes:
Mini cupcakes:
1/2 cup (1 stick) butter or margarine, softened
1 cups sugar
1 tsp vanilla
2 eggs
1 cup buttermilk
2 cups plus 1 tbsp flour
1 tsp baking powder
3/4 tsp baking soda
1/2 tsp salt
Beat together the butter and sugar until light and fluffy.
Add in the eggs and vanilla, beating until well mixed.
Mix in the buttermilk, then gradually stir in the flour, baking powder, baking soda and salt.
Divide among greased cupcake pans (I got about 24 mini ones and an extra 4 normal sized ones), and bake on 350 F for 12 to 15 minutes, or until tests clean. Baking time may vary so you have to keep an eye on the mini ones because they can go from just right to overdone quickly. Might be best to set for 10 minutes then start checking.
Top with frosting and sprinkles.
Chocolate Mousse:
8 eggs
10 ounces semi-sweet chocolate
Separate all the eggs into yolks and whites.
Melt the chocolate in a double boiler or microwave.
Place the egg yolks in the bottom of a large bowl. Add a small amount of chocolate to the yolks, stirring to combine. Pour in the rest of the chocolate and mix well, until completely combined.
Set aside.
Beat the egg whites on high until they form stiff peaks. Dollop a couple heaping tablespoons of the egg whites into the chocolate mixture and stir to combine.
Then, using a plastic spatula, fold in about a third of the egg whites at a time, being careful not to stir or deflate the whites. It helps to use a glass bowl so you can see if you've missed any parts that needs combining.
Pour into either a bowl or individual cups and cover, then refrigerate until set.
Note: This recipe can be scaled up and down as you would like. I generally average about 1 1/4 ounces of chocolate for 1 egg - but you don't have to be that exact. Follow all the instructions the same!
Today I'm going to tell you about a party I held a couple weeks ago in my backyard. You see, after oh so many celebrations, Shaya and Racheli got married. And, in Jewish tradition, the partying continues every night for a week after the wedding.
Welcome to the barbecue.
 We went with the standards - hot dogs, hamburgers, chicken; rice, potato salad, and a host of other salads - and lest you think I tackled this all by my lonesome, I had plenty of help.
But, back to what you're really here for - dessert. The requisite watermelon, of course, plus other fruit, pink-tinted rice krispie treats and mini peach cobblers provided by someone else, plus I made my classic chocolate chip cookies (though with some minor, but still edible screw-ups).
PLUS - Mini-sprinkle cupcakes:
After waxing-poetic about my new mini muffin pan that I reappropriated for tartlets, I finally put it to use for adorable tiny cupcakes.
 I'm sure they make mini cupcake liners, but I didn't have any, and I wasn't too worried about sticking, and I thought no liners would make them easier to eat, and I was always told to never write a run on sentence. Ha, good thing school is over for me.
 I certainly have more things in store for that pan - especially after my mother, who apparently reads this thing, bought me my very own tart shaper! Speaking of, she was also the guest photographer at this event, as I ran around worrying about things. Teamwork!
Anyway, up next on the menu: individual chocolate mousse cups.
 To be honest I'm not really the biggest fan of chocolate mousse - but I thought it would be cute, easy and popular. And it was. The recipe is, in the words of my least-favorite Food Network personality, "super simple" with two ingredients. Then I just divided it into little cups, and topped with whipped cream right before serving.
 Tada!
Tada!Tip of the Day: Chocolate mousse is indeed easy, but there are a few tips that are crucial to it's success. One is the tempering of the yolks - if you add all the melted chocolate at once you run the risk of "cooking" the yolks - and have scrambled egg mousse. Adding a bit at first brings their temperature up before mixing in the rest. Another crucial point is the folding of the egg whites as supposed to mixing - use a spatula to cut and lift the mixture, folding it over itself over again until combined - but we careful not to stir it, you'll deflate the lightness of the whipped egg whites.
Recipes:
Mini cupcakes:
1/2 cup (1 stick) butter or margarine, softened
1 cups sugar
1 tsp vanilla
2 eggs
1 cup buttermilk
2 cups plus 1 tbsp flour
1 tsp baking powder
3/4 tsp baking soda
1/2 tsp salt
Beat together the butter and sugar until light and fluffy.
Add in the eggs and vanilla, beating until well mixed.
Mix in the buttermilk, then gradually stir in the flour, baking powder, baking soda and salt.
Divide among greased cupcake pans (I got about 24 mini ones and an extra 4 normal sized ones), and bake on 350 F for 12 to 15 minutes, or until tests clean. Baking time may vary so you have to keep an eye on the mini ones because they can go from just right to overdone quickly. Might be best to set for 10 minutes then start checking.
Top with frosting and sprinkles.
Chocolate Mousse:
8 eggs
10 ounces semi-sweet chocolate
Separate all the eggs into yolks and whites.
Melt the chocolate in a double boiler or microwave.
Place the egg yolks in the bottom of a large bowl. Add a small amount of chocolate to the yolks, stirring to combine. Pour in the rest of the chocolate and mix well, until completely combined.
Set aside.
Beat the egg whites on high until they form stiff peaks. Dollop a couple heaping tablespoons of the egg whites into the chocolate mixture and stir to combine.
Then, using a plastic spatula, fold in about a third of the egg whites at a time, being careful not to stir or deflate the whites. It helps to use a glass bowl so you can see if you've missed any parts that needs combining.
Pour into either a bowl or individual cups and cover, then refrigerate until set.
Note: This recipe can be scaled up and down as you would like. I generally average about 1 1/4 ounces of chocolate for 1 egg - but you don't have to be that exact. Follow all the instructions the same!
Wednesday, February 17, 2010
Chocolate Covered Marble Pound Cake
I love making marble cake. It's my go to when I'm baking for people whose preferences I don't know - who doesn't like marble? And this recipe really delivered. I've been taught to be skeptical of cake recipes that call for cocoa powder instead of chocolate, but this was moist and delicious.
 One thing that was strange about this recipe was the baking directions - it baked for a while at 350, then more at 325, then even more covered. I don't think I've ever baked a cake covered before, but I figured I would follow the instructions as they were written, and I wasn't sorry. I guess because loaf pans are so deep, they take a while to cook through, and you don't want the top to burn.
 Luckily the cake popped right out of the pan, and once it cooled I covered it with a thick chocolate glaze, that set up hard. There's something about a loaf cake that I like too - maybe it's the neat slices. I really hate cutting up my own cakes - not because I can't bear to slice in to them, but because I usually make a mess of it. Luckily I can usually find someone else to slice.
 Time to go back to watching ice skating. And ski jumping. And snowboarding. And bobsled.
Tip of the Day: Most loaf pans are either 9x3 or 8x4, which can be used interchangeably. If you double a loaf pan recipe, you can use a standard bundt or tube pan, though baking times will likely be less.
Recipe:
Marble Pound Cake (from RecipeZaar)
3/4 cup (1 1/2 sticks) butter or margarine, softened
1 1/3 cups sugar
2 eggs
1 tbsp vanilla
2 cups flour
2 tsp baking powder
1/4 tsp salt
1/2 cup milk
2 tbsp melted butter
2 tbsp cocoa powder
Beat together the softened butter and sugar. Add in eggs, one at a time, beating until well mixed. Stir in vanilla.
Add in flour, baking powder and salt and mix until just combined. Mix in milk until smooth.
[Alternatively, process in food processor.]
Stir together the melted butter and cocoa until smooth. Mix with 1 cup of the batter.
Pour half the remaining batter in to a greased loaf pan, top with half the cocoa batter and swirl, repeating with the remaining batter.
Bake at 350 F for 25 minutes. Then reduce temperature to 325 F and bake for another 25 minutes. Loosely cover with foil, and bake an additional 15 to 20 minutes.
Chocolate Glaze:
1 stick (1/2 cup) butter or margarine
10 ounces semi-sweet chocolate
Heat together until melted and smooth. Allow to cool slightly before applying to completely cooled cake.
 One thing that was strange about this recipe was the baking directions - it baked for a while at 350, then more at 325, then even more covered. I don't think I've ever baked a cake covered before, but I figured I would follow the instructions as they were written, and I wasn't sorry. I guess because loaf pans are so deep, they take a while to cook through, and you don't want the top to burn.
 Luckily the cake popped right out of the pan, and once it cooled I covered it with a thick chocolate glaze, that set up hard. There's something about a loaf cake that I like too - maybe it's the neat slices. I really hate cutting up my own cakes - not because I can't bear to slice in to them, but because I usually make a mess of it. Luckily I can usually find someone else to slice.
 Time to go back to watching ice skating. And ski jumping. And snowboarding. And bobsled.
 Tip of the Day: Most loaf pans are either 9x3 or 8x4, which can be used interchangeably. If you double a loaf pan recipe, you can use a standard bundt or tube pan, though baking times will likely be less.
Recipe:
Marble Pound Cake (from RecipeZaar)
3/4 cup (1 1/2 sticks) butter or margarine, softened
1 1/3 cups sugar
2 eggs
1 tbsp vanilla
2 cups flour
2 tsp baking powder
1/4 tsp salt
1/2 cup milk
2 tbsp melted butter
2 tbsp cocoa powder
Beat together the softened butter and sugar. Add in eggs, one at a time, beating until well mixed. Stir in vanilla.
Add in flour, baking powder and salt and mix until just combined. Mix in milk until smooth.
[Alternatively, process in food processor.]
Stir together the melted butter and cocoa until smooth. Mix with 1 cup of the batter.
Pour half the remaining batter in to a greased loaf pan, top with half the cocoa batter and swirl, repeating with the remaining batter.
Bake at 350 F for 25 minutes. Then reduce temperature to 325 F and bake for another 25 minutes. Loosely cover with foil, and bake an additional 15 to 20 minutes.
Chocolate Glaze:
1 stick (1/2 cup) butter or margarine
10 ounces semi-sweet chocolate
Heat together until melted and smooth. Allow to cool slightly before applying to completely cooled cake.
Sunday, November 1, 2009
Chocolate Oatmeal Sandwich Cookies
What's better than one cookie? Why two cookies, of course. What's better than two cookies? Two cookies and chocolate frosting. Welcome to the sandwich cookie.
 The cookies in this sandwich are chocolate oatmeal cookies - a little chewy, a little crispy, a lot delicious. They're not too sweet, which is good because you're going to smother them in chocolate frosting, and, well, maybe there really can be too much of a good thing.
 You can use whatever type of frosting you want - store bought or homemade. I used some homemade I had left over for half, and when I ran out went straight for the can. You could even try sandwiching these with vanilla frosting, or peanut butter if you're feeling adventurous.
 After I sandwiched the cookies together, I stuck them in the fridge for an hour or so to firm up - since the cookies won't necessarily lie flat, they might slide apart and ruin the delicious sandwich. Refrigerating them helps them stay together, even once they're returned to room temperature.

Tip of the Day: When making sandwich cookies, the most important thing is finding cookies that match up in size. If you pair up the cookies before you begin filling, you'll be able to switch them around so everyone has their best match. And if there's an odd number? More to snack on.
Recipe: (adapted from Food Mayhem)
9 ounces (1 1/3 cups chips) semi-sweet chocolate
1 stick (1/2 cup) butter or margarine
3 eggs
1 cup sugar
2 tsps instant espresso powder
3/4 cup flour
1/3 tsp baking powder
1/4 tsp salt
2 cups oats
Chocolate Frosting
Melt the butter and chocolate together.
Beat the eggs, sugar and espresso powder together until thick and pale.
Beat in the chocolate mixture.
Gradually stir in the flour, baking powder and salt until just combined.
Stir in the oats.
Drop by rounded tablespoonfuls on to a greased baking sheet, 2 inches apart.
Bake on 350F for 8 to 10 minutes, until shiny and crackled on top.
Cool on sheets for one minute, then transfer to a wire rack to cool completely.
When completely cool, spread or pipe frosting on to the bottom of one cookie.
Sandwich a similar-sized cookie on on top.
 The cookies in this sandwich are chocolate oatmeal cookies - a little chewy, a little crispy, a lot delicious. They're not too sweet, which is good because you're going to smother them in chocolate frosting, and, well, maybe there really can be too much of a good thing.
 You can use whatever type of frosting you want - store bought or homemade. I used some homemade I had left over for half, and when I ran out went straight for the can. You could even try sandwiching these with vanilla frosting, or peanut butter if you're feeling adventurous.
 After I sandwiched the cookies together, I stuck them in the fridge for an hour or so to firm up - since the cookies won't necessarily lie flat, they might slide apart and ruin the delicious sandwich. Refrigerating them helps them stay together, even once they're returned to room temperature.
Tip of the Day: When making sandwich cookies, the most important thing is finding cookies that match up in size. If you pair up the cookies before you begin filling, you'll be able to switch them around so everyone has their best match. And if there's an odd number? More to snack on.
Recipe: (adapted from Food Mayhem)
9 ounces (1 1/3 cups chips) semi-sweet chocolate
1 stick (1/2 cup) butter or margarine
3 eggs
1 cup sugar
2 tsps instant espresso powder
3/4 cup flour
1/3 tsp baking powder
1/4 tsp salt
2 cups oats
Chocolate Frosting
Melt the butter and chocolate together.
Beat the eggs, sugar and espresso powder together until thick and pale.
Beat in the chocolate mixture.
Gradually stir in the flour, baking powder and salt until just combined.
Stir in the oats.
Drop by rounded tablespoonfuls on to a greased baking sheet, 2 inches apart.
Bake on 350F for 8 to 10 minutes, until shiny and crackled on top.
Cool on sheets for one minute, then transfer to a wire rack to cool completely.
When completely cool, spread or pipe frosting on to the bottom of one cookie.
Sandwich a similar-sized cookie on on top.
Tuesday, October 6, 2009
Chocolate Filled Cupcakes
I like chocolate. A lot of people like chocolate. I also like vanilla. I'm guessing a lot of people like vanilla too. So when I made cupcakes to bring to the office a few weeks ago, I frosted them half in chocolate, and half in vanilla.
 And every single chocolate cupcake was gone before even one vanilla was taken. Of course soon after that, every single vanilla cupcake was gone too. Hmmmm.
Anyway these were filled cupcakes - which really means that I dropped a few chocolate chips in to the middle of each one before I baked them.
 If I'd mixed the chocolate chips in to the batter, these would be chocolate chip cupcakes, but because they're only in the middle, they're chocolate filled? Right? Work with me here.
 Ah look, hidden filling! Of course anything would be hidden by the time I frosted them.
Frosting, which, by the way, came from a can. Oops. Back to school means back to more storebought for me. But it'll be our little secret, OK?
Well once I was done I just had to eat a chocolate one. I know, those vanillas are getting jealous.
 You can't tell though, right?

Recipe:
1 1/3 cups flour
1 cup sugar
1 1/2 tsp baking powder
1/2 tsp salt
1/3 cup shortening
1/2 cup milk
2 tsps vanilla
1 egg
chocolate chips
frosting
Stir together the flour, sugar, baking powder and salt.
Beat in the shortening, milk, vanilla and egg until well mixed.
Divided the batter among 12, paper-lined muffin cups.
Drop five or six chocolate chips in to the center of each cupcake.
Bake on 350 F for 20 minutes.
Cool in the pan for 2 minutes then remove to wire rack to cool completely.
Frost.
 So when I made cupcakes to bring to the office a few weeks ago, I frosted them half in chocolate, and half in vanilla.
 And every single chocolate cupcake was gone before even one vanilla was taken. Of course soon after that, every single vanilla cupcake was gone too. Hmmmm.
Anyway these were filled cupcakes - which really means that I dropped a few chocolate chips in to the middle of each one before I baked them.
 If I'd mixed the chocolate chips in to the batter, these would be chocolate chip cupcakes, but because they're only in the middle, they're chocolate filled? Right? Work with me here.
 Ah look, hidden filling! Of course anything would be hidden by the time I frosted them.
Frosting, which, by the way, came from a can. Oops. Back to school means back to more storebought for me. But it'll be our little secret, OK?
Well once I was done I just had to eat a chocolate one. I know, those vanillas are getting jealous.
 You can't tell though, right?
Recipe:
1 1/3 cups flour
1 cup sugar
1 1/2 tsp baking powder
1/2 tsp salt
1/3 cup shortening
1/2 cup milk
2 tsps vanilla
1 egg
chocolate chips
frosting
Stir together the flour, sugar, baking powder and salt.
Beat in the shortening, milk, vanilla and egg until well mixed.
Divided the batter among 12, paper-lined muffin cups.
Drop five or six chocolate chips in to the center of each cupcake.
Bake on 350 F for 20 minutes.
Cool in the pan for 2 minutes then remove to wire rack to cool completely.
Frost.
Monday, September 14, 2009
New Cookbook and Reese's Peanut Butter Cake
I love peanut butter. Though I've mentioned how much I dislike nuts in baked goods (and peanuts are included in that), I still love peanut butter. But if you search on this website, you'll only find a handful of PB recipes. I'm not quite sure why. Perhaps because many of my close friends (with the documented exception of my friend Esti), and one of my brothers, doesn't like peanut butter, and when baking for groups I'm always mindful of allergies.
Well, when I got the opportunity to test out a recipe from America's Most Wanted Recipes - which recreates recipes from famous restaurants - and I was flipping through the book to select a dish to try, I immediately bookmarked Romanos Macaroni Grill's Reeses Peanut Butter Cake. Since I recently celebrated a birthday, I figured I deserved something I really liked.
 Like many cakes that seem daunting, this one is really just a simple combination of three parts. The peanut butter cake, the peanut butter filling, and the chocolate topping.
 This recipe created two 9-inch-layers which can either be left separate or combined into a layer cake.
To my surprise, this recipe was lacking in one thing: sugar. The filling has two ingredients, peanut butter and cream cheese. When mixed together, it is creamy and a little bit tangy but not very sweet, and I don't think I would have liked biting into it very much in the middle of my cake. So I added around 1/4 cup of sugar, perhaps a little less. I did it gradually, and you can adjust it to your tastes.
So I sandwiched the cakes together with the peanut butter and cream cheese filling, and then spread the rest of it on top.
Next came the frosting. Again, I felt it lacked a little sweetness, and added in a couple tablespoons of confectioner's sugar to get the right taste.
 The chocolate glaze was also pretty...liquidy. I may have made a little bit of a mess.
I think it's smiling at me though.
 In the end, I wanted a little neater look for the cake, so I filled it all in with more frosting, and did a little chocolate drizzel on the top. Perfect for every dessert, remember?
 Overall the cake was pretty good, but really heavy. The cake itself was very dense - almost like the filling of a peanut butter cup - hard to eat a whole lot at a time. I also spent a while cleaning up after the glaze.
I think the idea of this cake is definitely one I'll try to perfect in the future,
Tip of the Day: Fillings and frostings will have very different consistencies at different temperatures. For most, room temperature will be ideal for spreading. Refrigerating will often make them much thicker and sometimes solid. When heated, many frostings will be pourable. Make sure yours is at the right temperature for your needs.
Recipe: (from America's Most Wanted Recipes)
Cake:
3/4 cup creamy peanut butter
3/4 cup (1 1/2 sticks) butter or margarine, softened
2 cups packed light brown sugar
3 eggs
2 cups flour
1 tbsp baking powder
1/2 tsp salt
1 cup milk
1 tsp vanilla
Filling:
1 cup cream cheese, softened
1/2 cup creamy peanut butter
sugar, to taste
Glaze:
1/2 cup water
4 tbsp butter or margarine
1/2 cup cocoa
1 cup confectioner's sugar
1 tsp vanilla
Beat the butter and peanut butter together.
Mix in the brown sugar. Add the eggs, one at a time, mixing well.
Add in the flour, baking powder and salt gradually, then the milk and vanilla.
Pour into two greased 9-inch pans. Bake on 350 F for 35 to 40 minutes.
Cool in the pans for 5 minutes, then invert onto cooling rack. Cool completely.
Mix the cream cheese and peanut butter together. Add sugar to taste.
Spread over both cakes, and sandwich together. Refrigerate.
Bring the butter and water to a boil. Add the cocoa, sugar and vanilla.
Mix until smooth. Spread over top and sides of cake.
Friday, September 11, 2009
M Cake
When my friend Miriam had a birthday this summer, I didn't want to make a round or square cake. Boring! Instead, I whipped out my knife (or gingerly removed it from the drawer) and carved up my square cake into letter M.
 (Portions of today's programming are brought to you by the number 7, and the letter M.)
I started with a square layer cake, and trimmed off the edges. And ate the edges.
 Then I cut out a triangle from the top of the square, and the M shape into the bottom.
A lot of frosting and one candle later - celebration!
 Now, hypothetically speaking, you could attempt this with any letter - but I lucked out here with the M, probably one of the easiest to do. An S would be more of a challenge to cut, and an A would certainly be difficult to frost. An L would be great, except you wouldn't have too much cake. What I really need, is to make a new friend whose name begins with Z. Any takers?
Tip of the Day: Your cake must be completely cool before frosting or it will all melt off. If you're in a rush and don't have time to let it cool on the counter, stick it in the fridge or freezer for a short while. But make sure you don't freeze it solid if you're planning on eating it right after!
Recipe:
Cake: (adapted from smitten kitchen)
2 cups plus 1 tbsp flour
2 tsps baking powder
1 1/2 tsps baking soda
1 tsp salt
1/2 cup (1 stick ) butter or margarine, softened
1 cups sugar
1 tsp vanilla
2 eggs
1 cup buttermilk
Beat together the butter and sugar until light and fluffy. Add in the vanilla.
Beat in the eggs, one at a time. Beat in buttermilk (mix will look curdled).
Gradually mix in flour, baking powder, baking soda and salt.
Pour batter in to a parchment paper lined 8 inch square cake pan.
Bake at 350 F for 35 to 40 minutes.
Cool in pan ten minutes then invert on to wire rack.
Frosting (from smitten kitchen)
12 ounces semisweet chocolate, finely chopped
3/4 cup heavy cream
1 1/2 tbsps sugar
1 1/2 tbsps light corn syrup
3 tbsp butter
Bring the cream, sugar and corn syrup to a boil over low heat, mixing until well combined.
Remove from heat and whisk in chocolate until melted and smooth. Add in butter until stir until melted and combined. Let sit until comes to room temperature. Do not refrigerate before use - it will harden.
Monday, September 7, 2009
Chocolate Chocolate Cupcakes
While I do love frosting, sometimes its nice to have a cupcake with just a little decoration.
 These chocolate, chocolate cupcakes are just the thing, really simple and without that big mound of buttercream on top.
The recipe called for 12, but I only got 11 out of it. Guess mine were a little too big.
 They baked up with beautiful domes, nice and high which I like. Flat cupcakes are boring.
 To decorate these, I used my trusty chocolate frosting (recipe below), and a ziploc bag. That's right, just a plastic bag. Sure, I have fancy decorating bags and tips and couplers and all that stuff, and I do use them, but really, for something like this, a plastic bag with the tip snipped is all you need.
 This is also a great tip to give a finishing touch to almost practically any baked good - what couldn't be improved by a chocolate drizzle?
 Tip of the Day: If you're all out of toothpicks and you need to check if your cake or cupcakes are done, press gently on the dome. It should be firm, and spring back within a second or two.
Recipe:
Cake (from Food and Wine)
4 tbsp (1/2 stick) butter or margarine
1/4 cup vegetable oil
1/2 cup water
1 cup flour
1 cup sugar
1/4 cup plus 2 tblsps cocoa powder
3/4 tsp baking soda
1/8 tsp salt
1 egg
1/4 cup milk
1 tsp vanilla
Melt the butter, oil and water together. Add it to the flour, sugar, cocoa powder, baking soda and salt, and beat together until well mixed.
Add the egg and beat until incorporated.
Mix in the milk and vanilla. Pour the batter into 12 cupcake tins lined with paper cases (I got 11). they should be about 3/4 full.
Bake on 350 for about 25 minutes.
Frosting: (from smitten kitchen)
6 ounces semisweet chocolate, finely chopped
6 tbsp heavy cream
3/4 tbsp sugar
3/4 tbsp light corn syrup
1 1/2 tbsp butter
Bring the sugar, corn syrup and cream to a boil.
Remove from heat and stir in chocolate until melted.
Add butter and mix until melted.
Wednesday, September 2, 2009
Airplane Cake
The Troublesome Trio met again a few weeks ago before we departed for different corners of the world. What better way to celebrate than with Airplane Cake?
 Sarah, Ariel and I (seen before in Cow Cake, Chocolate Ganache Bars and Cupcake Cones) met up before Sarah took a trip to Kazakhstan, (she's since returned) and Ariel went to Copenhagen for the semester (follow her travels at Ariel Abroad), and I....well I stayed in New York. Clearly I'm not well traveled enough to be friends with these two.
Which is why I brought cake! After deciding that an airplane cake was the way to go, I spent hours googling other airplane cakes, before deciding on my plan of attack. I've never made a carved cake before, so I was a little nervous.
I started with two plain old 9 inch rounds. You can see the recipe I used below.
 I froze my layers for a while before starting, because it makes all the carving and slicing easier, as well as reduces crumbs when frosting.
Oh my god, a naked airplane!
 This was the first coat of frosting, called a crumb coat. It gets all the possible crumbs stuck down, to prepare it for the second coat.
 I never quite got the coverage I wanted, even with several coats with refrigeration in between. I probably should have used a better quality frosting (this was canned), plus its harder with white than chocolate or another color.
 After I was satisfied with the multiple coats. Now, decorating isn't really my thing, although I've been getting more practice at it lately, so I'm sure most of you could do better than my misshapen windows. And this was the better side.
Now all that's left is to clean off the cake board! Some people would rather cover the board with strips of parchment paper and pull them out afterwards, but I'd rather have to clean the board then have them in the way.
 Let them eat cake!
 We're really great at posing for pictures. Some may say we have a gift.
 After spending so much time on a cake, it is sometimes hard to cut into it - but Sarah didn't have that problem!
 Airplane cake guts. It was delicious.

Tip of the Day: If you don't have a cake board that is the size or shape you need, just cut it out from a large piece of cardboard and cover it with heavy duty foil. Just make sure your cardboard is strong enough to hold your cake and won't buckle.
Recipe:
Cake: (from smitten kitchen)
4 cups and 2 tablespoons flour
2 tsps baking powder
1 1/2 tsps baking soda
1 tsp salt
2 sticks (1 cup) butter or margarine, softened
2 cups sugar
2 tsps vanilla
4 eggs
2 cups buttermilk
Beat together the butter and sugar until light and fluffy. Add in the vanilla.
Beat in the eggs, one at a time. Beat in buttermilk (mix will look curdled).
Gradually mix in flour, baking powder, baking soda and salt.
Divide batter between two parchment paper lined 9 inch round cake pans.
Bake at 350 F for 35 to 40 minutes.
Cool in pan ten minutes then invert on to wire rack.
Assembly:
Trim the two 9 inch rounds so they are flat and even.
Slice one exactly in half, and sandwich the two halves together to create a double layer semi-circle. Trim the top of the semi circle so it is flat.
Attach it to your cake board with a dollop of frosting.
Cut the remaining round in half as well.
Cut one of the halves in half again. Each 1/4 of a cake will be a wing of the cake.
Arrange them around the body of the plane, and attach with frosting.
Cut a tail shape out of the remaining cake and attach it to the back of the plane with frosting.
Cover the whole cake with frosting - you will probably need two layers. Decorate as desired.
 Sarah, Ariel and I (seen before in Cow Cake, Chocolate Ganache Bars and Cupcake Cones) met up before Sarah took a trip to Kazakhstan, (she's since returned) and Ariel went to Copenhagen for the semester (follow her travels at Ariel Abroad), and I....well I stayed in New York. Clearly I'm not well traveled enough to be friends with these two.
Which is why I brought cake! After deciding that an airplane cake was the way to go, I spent hours googling other airplane cakes, before deciding on my plan of attack. I've never made a carved cake before, so I was a little nervous.
I started with two plain old 9 inch rounds. You can see the recipe I used below.
 I froze my layers for a while before starting, because it makes all the carving and slicing easier, as well as reduces crumbs when frosting.
Oh my god, a naked airplane!
 This was the first coat of frosting, called a crumb coat. It gets all the possible crumbs stuck down, to prepare it for the second coat.
 I never quite got the coverage I wanted, even with several coats with refrigeration in between. I probably should have used a better quality frosting (this was canned), plus its harder with white than chocolate or another color.
 After I was satisfied with the multiple coats. Now, decorating isn't really my thing, although I've been getting more practice at it lately, so I'm sure most of you could do better than my misshapen windows. And this was the better side.
Now all that's left is to clean off the cake board! Some people would rather cover the board with strips of parchment paper and pull them out afterwards, but I'd rather have to clean the board then have them in the way.
 Let them eat cake!
 We're really great at posing for pictures. Some may say we have a gift.
 After spending so much time on a cake, it is sometimes hard to cut into it - but Sarah didn't have that problem!
 Airplane cake guts. It was delicious.
Tip of the Day: If you don't have a cake board that is the size or shape you need, just cut it out from a large piece of cardboard and cover it with heavy duty foil. Just make sure your cardboard is strong enough to hold your cake and won't buckle.
Recipe:
Cake: (from smitten kitchen)
4 cups and 2 tablespoons flour
2 tsps baking powder
1 1/2 tsps baking soda
1 tsp salt
2 sticks (1 cup) butter or margarine, softened
2 cups sugar
2 tsps vanilla
4 eggs
2 cups buttermilk
Beat together the butter and sugar until light and fluffy. Add in the vanilla.
Beat in the eggs, one at a time. Beat in buttermilk (mix will look curdled).
Gradually mix in flour, baking powder, baking soda and salt.
Divide batter between two parchment paper lined 9 inch round cake pans.
Bake at 350 F for 35 to 40 minutes.
Cool in pan ten minutes then invert on to wire rack.
Assembly:
Trim the two 9 inch rounds so they are flat and even.
Slice one exactly in half, and sandwich the two halves together to create a double layer semi-circle. Trim the top of the semi circle so it is flat.
Attach it to your cake board with a dollop of frosting.
Cut the remaining round in half as well.
Cut one of the halves in half again. Each 1/4 of a cake will be a wing of the cake.
Arrange them around the body of the plane, and attach with frosting.
Cut a tail shape out of the remaining cake and attach it to the back of the plane with frosting.
Cover the whole cake with frosting - you will probably need two layers. Decorate as desired.
Thursday, August 20, 2009
Complete and Total Disaster
I made a vow when I started this blog, that I would always share my complete disasters alongside my resounding successes, however embarassing. I now want to break that vow. But I won't.
I have never, ever, had so much go wrong in the kitchen before I attempted this recipe.
Here's what I ended up with at the end of several hours. Pretty, isn't it.
 Let's just say it wasn't quite what I was going for. If we backtrack several hours, 14 eggs and a few tears, I set out on this Thursday evening to make a Charlotte Royale. And I didn't even come close. A Charlotte Royale is a sponge roll that is cut into slices and used to line a round mold which is filled with mousse.
And it went wrong in ways I couldn't have imagined. Some of them my fault, some of them not, all of them captured on film.
Disaster #1: The sponge.
I followed the recipe to make a chocolate sponge. The directions called for it to bake in a 12x14 inch pan, which I did not have. So I decided to just bake it in a 12x16 inch pan. Ah, you must be thinking here is where I went wrong. Nope.
I pour the sponge batter into the pan, and I notice that it seems like it wouldn't have even filled a 12x14" pan.
 Whatever, I think. Then as I'm about to slide it in the oven, I lick my finger that had some of the batter on it. I almost gag. It's bitter and awful. I ran back to my list of ingredients. I forgot the sugar.
At this stage, I'm about to give up already, but I persevere, throw it away, and start over.
Wrong decision.
I mix together another batch of batter, with sugar this time, and put it in the oven to bake.
This one fills the pan a lot better. Shocker.
 Disaster #2: The cream.
Every good swiss/sponge roll has a cream filling. The instructions I had for this one seemed simple enough, if not a little water-heavy, but I assumed it would all come together.
Assume nothing. (Name that TV show)
The recipe called for me to mix the butter and sugar on high, and then very gradually mix in boiling water. I went very gradually. And came up with this.
 Does this look like white fluffy cream to you? Even from the side? Are you sure?
Yet again, I should have given up. But I didn't. What was I thinking?
Disaster #3: The roll.
After the cream disaster, I decided I would still go through with the roll, and just use a basica vanilla frosting recipe, with shortening, sugar and vanilla. Foolproof.
At this point the sponge had come out of the oven, and was looking quite sponge like.
 I cut it into the pieces required, and lifted it out of the pan. Oops, it broke. Even with this crack down the middle, I still DID NOT GIVE UP.
Clearly I have no intuition.
 So I spread my second sponge of the evening, which was already cracked, with my second filling of the evening.
 What's next? Rolling it up of course. I think you see where this is going.

 Did you see that coming? Did you? I didn't.
Well at this point, with 14 eggs, two sticks of butter and several hours wasted, I GAVE UP.
Finally.
It's going to be a long time before I'll ever try that again. A very long time.
Lucky for me, I already had a backup dessert planned in case of epic failure.
Stay tuned and find out what finally went right.
Tip of the Day: When everything's going wrong, don't cry, just take pictures of it. It'll make it seem a whole lot funnier. Trust me.
I have never, ever, had so much go wrong in the kitchen before I attempted this recipe.
Here's what I ended up with at the end of several hours. Pretty, isn't it.
 Let's just say it wasn't quite what I was going for. If we backtrack several hours, 14 eggs and a few tears, I set out on this Thursday evening to make a Charlotte Royale. And I didn't even come close. A Charlotte Royale is a sponge roll that is cut into slices and used to line a round mold which is filled with mousse.
And it went wrong in ways I couldn't have imagined. Some of them my fault, some of them not, all of them captured on film.
Disaster #1: The sponge.
I followed the recipe to make a chocolate sponge. The directions called for it to bake in a 12x14 inch pan, which I did not have. So I decided to just bake it in a 12x16 inch pan. Ah, you must be thinking here is where I went wrong. Nope.
I pour the sponge batter into the pan, and I notice that it seems like it wouldn't have even filled a 12x14" pan.
 Whatever, I think. Then as I'm about to slide it in the oven, I lick my finger that had some of the batter on it. I almost gag. It's bitter and awful. I ran back to my list of ingredients. I forgot the sugar.
At this stage, I'm about to give up already, but I persevere, throw it away, and start over.
Wrong decision.
I mix together another batch of batter, with sugar this time, and put it in the oven to bake.
This one fills the pan a lot better. Shocker.
 Disaster #2: The cream.
Every good swiss/sponge roll has a cream filling. The instructions I had for this one seemed simple enough, if not a little water-heavy, but I assumed it would all come together.
Assume nothing. (Name that TV show)
The recipe called for me to mix the butter and sugar on high, and then very gradually mix in boiling water. I went very gradually. And came up with this.
 Does this look like white fluffy cream to you? Even from the side? Are you sure?
Yet again, I should have given up. But I didn't. What was I thinking?
Disaster #3: The roll.
After the cream disaster, I decided I would still go through with the roll, and just use a basica vanilla frosting recipe, with shortening, sugar and vanilla. Foolproof.
At this point the sponge had come out of the oven, and was looking quite sponge like.
 I cut it into the pieces required, and lifted it out of the pan. Oops, it broke. Even with this crack down the middle, I still DID NOT GIVE UP.
Clearly I have no intuition.
 So I spread my second sponge of the evening, which was already cracked, with my second filling of the evening.
 What's next? Rolling it up of course. I think you see where this is going.
 Did you see that coming? Did you? I didn't.
Well at this point, with 14 eggs, two sticks of butter and several hours wasted, I GAVE UP.
Finally.
It's going to be a long time before I'll ever try that again. A very long time.
Lucky for me, I already had a backup dessert planned in case of epic failure.
Stay tuned and find out what finally went right.
Tip of the Day: When everything's going wrong, don't cry, just take pictures of it. It'll make it seem a whole lot funnier. Trust me.
Subscribe to:
Posts (Atom)