

Showing posts with label vanilla. Show all posts
Showing posts with label vanilla. Show all posts
Monday, November 29, 2010
Monogrammed Cupcakes
Oh where to start? How about with this: My friend Leora is engaged! And she had a party. And I baked. Of course. Cupcakes! With their initials on them! I cannot speak in full sentences! I don't know why.

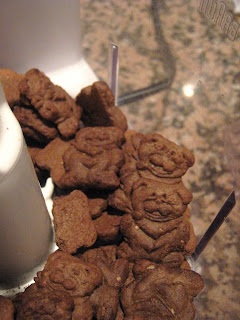
Wednesday, October 13, 2010
Giant Marble Cookies
Here's a riddle for you. What's better than a cookie? A giant cookie! And this thought pattern was all the logic and incentive behind these giant marble cookies. Welcome inside my head. It's a strange place. 

Monday, May 24, 2010
Brownie Mosaic Cheesecake
Last week was the Jewish holiday of Shavuot. Celebrating the receiving of the Torah and marked by the consumption of dairy products, it's a great holiday all around. Cheesecake!
 Since I don't make cheesecake all that often (with the exception of a Thanksgiving adventure and last Shavuot) - I like to plan an elaborate one. This brownie mosaic cheesecake from Smitten Kitchen definitely fit the bill.
 There are four components - the crust, the cream cheese filling, the brownies and the ganache topping. Each component simple, and coming together in the most delicious manner.
 I made the brownies the day before, and was pleasantly surprised that my cheesecake was in the oven within an hour of starting. And boy was it delicious. Somehow it didn't look as neat and perfect as Smitten Kitchen's, but really that isn't much of a surprise. Also, you'll have way to much brownie left over - but, that didn't seem to be too much of a problem in my house.
It was still really rich and heavy in the way that only cheesecakes can be, studded with brownies that somehow blended in in texture but kept the rich brownie flavor, and a delicious cookie crust.
 About that crust - as per Smitten Kitchen instructions, I used smiling, precious teddy bear shaped graham crackers - much more satisfying to crush and kill.
Though the instructions were given for a doubled crust I was a reluctant to do so, but then found that the crust only really covered the bottom of the pan, not the sides. If you want it to come up higher on the sides of the pan, double the amounts I give.
 Oh the carnage!
 A survivor surveys the wreckage.
 I wasn't actually originally planning on making the ganache to top the cheesecake, but when it came out of the oven I thought it was a little ugly looking, so I figured I should cover it up. I ignored her recipe and just melted some chocolate chips and butter together, which is fine for eating within a day or two but may temper otherwise.
Tip of the Day: Though I often bake brownies and other bar cookies in foil, this time I wanted the crisp edge that a metal baking pan gives for making the cubes.
Recipe: (adapted from Smitten Kitchen)
Brownies:
4 ounces semisweet chocolate
3/4 cup (1 1/2 sticks) butter or margarine
1 1/2 cups sugar
3 eggs
1 tsp vanilla
1/2 tsp salt
1 cup flour
Crust:
1 1/2 cups or 5 ounces finely ground chocolate cookies or wafers
5 tbsps melted butter or margarine
1/3 cup sugar
1/8 tsp salt
Filling:
3 (8 ounce) packages cream cheese, softened
4 eggs
1 tsp vanilla
1 cup sugar
2 cups brownie cubes
Ganache:
3 ounces bittersweet chocolate, chopped
1/2 stick (4 tbsp) butter
1/4 cup heavy cream
1/2 tsp vanilla
1 tbsp confectioners sugar
Brownies:
Melt the chocolate and butter together in a large bowl. Stir in the sugar, then the eggs and vanilla. Stir in the flour and salt.
Line a 9x13" pan with foil and grease. Pour in the batter and bake for 30 to 35 minutes on 350 F. Let cool and refrigerate until needed (makes it easier to cube).
Crust:
Stir the cookie crumbs, melted butter, sugar and salt together.
Press into the bottom of a greased 10 inch springform pan.
Filling:
Beat the cream cheese on medium until fluffy. Add eggs, one at a time, until incorporated.
Beat in sugar and vanilla.
Gently fold in 2 to 3 cups of 1-inch brownie cubes. Pour into the prepared crust, and bake on 350 for about 40 minutes, or until it is set on the outside ring.
Ganache:
When cake is cooled completely, grind the chocolate into powder in the food processor.
Scald the butter and cream in a saucepan, the pour it into the feed tube of the food processor while the machine is running. Blend until smooth, then add the vanilla and sugar. Spread over cheesecake.
 Since I don't make cheesecake all that often (with the exception of a Thanksgiving adventure and last Shavuot) - I like to plan an elaborate one. This brownie mosaic cheesecake from Smitten Kitchen definitely fit the bill.
 There are four components - the crust, the cream cheese filling, the brownies and the ganache topping. Each component simple, and coming together in the most delicious manner.
 I made the brownies the day before, and was pleasantly surprised that my cheesecake was in the oven within an hour of starting. And boy was it delicious. Somehow it didn't look as neat and perfect as Smitten Kitchen's, but really that isn't much of a surprise. Also, you'll have way to much brownie left over - but, that didn't seem to be too much of a problem in my house.
It was still really rich and heavy in the way that only cheesecakes can be, studded with brownies that somehow blended in in texture but kept the rich brownie flavor, and a delicious cookie crust.
 About that crust - as per Smitten Kitchen instructions, I used smiling, precious teddy bear shaped graham crackers - much more satisfying to crush and kill.
Though the instructions were given for a doubled crust I was a reluctant to do so, but then found that the crust only really covered the bottom of the pan, not the sides. If you want it to come up higher on the sides of the pan, double the amounts I give.
 Oh the carnage!
 A survivor surveys the wreckage.
 I wasn't actually originally planning on making the ganache to top the cheesecake, but when it came out of the oven I thought it was a little ugly looking, so I figured I should cover it up. I ignored her recipe and just melted some chocolate chips and butter together, which is fine for eating within a day or two but may temper otherwise.
 Tip of the Day: Though I often bake brownies and other bar cookies in foil, this time I wanted the crisp edge that a metal baking pan gives for making the cubes.
Recipe: (adapted from Smitten Kitchen)
Brownies:
4 ounces semisweet chocolate
3/4 cup (1 1/2 sticks) butter or margarine
1 1/2 cups sugar
3 eggs
1 tsp vanilla
1/2 tsp salt
1 cup flour
Crust:
1 1/2 cups or 5 ounces finely ground chocolate cookies or wafers
5 tbsps melted butter or margarine
1/3 cup sugar
1/8 tsp salt
Filling:
3 (8 ounce) packages cream cheese, softened
4 eggs
1 tsp vanilla
1 cup sugar
2 cups brownie cubes
Ganache:
3 ounces bittersweet chocolate, chopped
1/2 stick (4 tbsp) butter
1/4 cup heavy cream
1/2 tsp vanilla
1 tbsp confectioners sugar
Brownies:
Melt the chocolate and butter together in a large bowl. Stir in the sugar, then the eggs and vanilla. Stir in the flour and salt.
Line a 9x13" pan with foil and grease. Pour in the batter and bake for 30 to 35 minutes on 350 F. Let cool and refrigerate until needed (makes it easier to cube).
Crust:
Stir the cookie crumbs, melted butter, sugar and salt together.
Press into the bottom of a greased 10 inch springform pan.
Filling:
Beat the cream cheese on medium until fluffy. Add eggs, one at a time, until incorporated.
Beat in sugar and vanilla.
Gently fold in 2 to 3 cups of 1-inch brownie cubes. Pour into the prepared crust, and bake on 350 for about 40 minutes, or until it is set on the outside ring.
Ganache:
When cake is cooled completely, grind the chocolate into powder in the food processor.
Scald the butter and cream in a saucepan, the pour it into the feed tube of the food processor while the machine is running. Blend until smooth, then add the vanilla and sugar. Spread over cheesecake.
Tuesday, October 6, 2009
Chocolate Filled Cupcakes
I like chocolate. A lot of people like chocolate. I also like vanilla. I'm guessing a lot of people like vanilla too. So when I made cupcakes to bring to the office a few weeks ago, I frosted them half in chocolate, and half in vanilla.
 And every single chocolate cupcake was gone before even one vanilla was taken. Of course soon after that, every single vanilla cupcake was gone too. Hmmmm.
Anyway these were filled cupcakes - which really means that I dropped a few chocolate chips in to the middle of each one before I baked them.
 If I'd mixed the chocolate chips in to the batter, these would be chocolate chip cupcakes, but because they're only in the middle, they're chocolate filled? Right? Work with me here.
 Ah look, hidden filling! Of course anything would be hidden by the time I frosted them.
Frosting, which, by the way, came from a can. Oops. Back to school means back to more storebought for me. But it'll be our little secret, OK?
Well once I was done I just had to eat a chocolate one. I know, those vanillas are getting jealous.
 You can't tell though, right?

Recipe:
1 1/3 cups flour
1 cup sugar
1 1/2 tsp baking powder
1/2 tsp salt
1/3 cup shortening
1/2 cup milk
2 tsps vanilla
1 egg
chocolate chips
frosting
Stir together the flour, sugar, baking powder and salt.
Beat in the shortening, milk, vanilla and egg until well mixed.
Divided the batter among 12, paper-lined muffin cups.
Drop five or six chocolate chips in to the center of each cupcake.
Bake on 350 F for 20 minutes.
Cool in the pan for 2 minutes then remove to wire rack to cool completely.
Frost.
 So when I made cupcakes to bring to the office a few weeks ago, I frosted them half in chocolate, and half in vanilla.
 And every single chocolate cupcake was gone before even one vanilla was taken. Of course soon after that, every single vanilla cupcake was gone too. Hmmmm.
Anyway these were filled cupcakes - which really means that I dropped a few chocolate chips in to the middle of each one before I baked them.
 If I'd mixed the chocolate chips in to the batter, these would be chocolate chip cupcakes, but because they're only in the middle, they're chocolate filled? Right? Work with me here.
 Ah look, hidden filling! Of course anything would be hidden by the time I frosted them.
Frosting, which, by the way, came from a can. Oops. Back to school means back to more storebought for me. But it'll be our little secret, OK?
Well once I was done I just had to eat a chocolate one. I know, those vanillas are getting jealous.
 You can't tell though, right?
Recipe:
1 1/3 cups flour
1 cup sugar
1 1/2 tsp baking powder
1/2 tsp salt
1/3 cup shortening
1/2 cup milk
2 tsps vanilla
1 egg
chocolate chips
frosting
Stir together the flour, sugar, baking powder and salt.
Beat in the shortening, milk, vanilla and egg until well mixed.
Divided the batter among 12, paper-lined muffin cups.
Drop five or six chocolate chips in to the center of each cupcake.
Bake on 350 F for 20 minutes.
Cool in the pan for 2 minutes then remove to wire rack to cool completely.
Frost.
Sunday, July 26, 2009
Chocolate Swirl Cookies
Any of you who are frequent readers of Cake Wrecks, might recall a frequent feature where she shows a picture of the cake requested, and then a picture of what was ultimately delivered, often with disastrous results. (Good example here). I felt a little bit like that with this recipe for Chocolate Swirl Cookies.
 The cookies came out tasting better than I expected, but they just didn't have the look I was going for. Instead they looked amateurish and messy. See, on the food network site where this recipe originated, the cookies looked like this:
 Perfect lines, perfect circles, equal doughs - just right. Mine, however, were a little sloppier looking.
This cookie is made by creating the two different doughs - vanilla and chocolate - and then rolling each out into a rectangle. After chilling them both, you lay one on top of the other, like so:
 Then you roll the dough up into a tight cylinder creating the spiral look inside. This is returned to the fridge for a few hours, or until you're ready to slice and bake.
 Since I didn't have a great knife to cut this, I put it in the freezer for about half an hour before slicing.
 The cookies actually came out pretty nicely - in 1/4 inch slices. Half way through the slicing I stuck it back in for a few minutes since it has softened up a little while out of the fridge. Some of them got a little squished while I sliced, but they were easy to morph back into a circular shape.
 At this stage, I knew the cookies didn't look quite like the picture, since the spiral was crooked and uneven in places, and even broken in a few spots. Somehow though I imagined that during the baking process that would even out and "melt" into a perfect spiral.
 Didn't happen. Oh well, they were all eaten - and were a great tasting cookie - not too sweet like a sugar cookie, so you could really taste the chocolate and the vanilla - not just sugar.
Tip of the Day: When making a chocolate and vanilla dough/batter, like these or these, always make the vanilla first so you dont' have to clean out the bowl before starting on the next dough.
Recipe: (via Food Network)
Vanilla Dough:
1/2 cup sugar
2 tbsp confectioners' sugar
1/4 tsp salt
1 large egg
1 tsp vanilla extract
1 cup unsalted butter, softened
2 cups flour
Chocolate Dough:
1 1/4 cups sugar
3/4 cup cocoa powder
1/4 tsp salt
1 cup butter, softened
1 large egg
1 1/2 cups flour
For the vanilla dough: Beat the butter until smooth. Add the two sugars and salt. Add the egg and vanilla and mix well. Gradually add the flour, mixing slowly until blended.
Turn the dough out of the bowl and divide in half. Place between 2 pieces of parchment or waxed paper. Roll into a 10 by 12 by 1/4 inch rectangle. Refrigerate until firm, about 2 hours or overnight.
For the chocolate dough: Beat the butter until smooth. Add the sugar, cocoa and salt and mix well. Add the egg and beat until smooth. Gradually add the flour, mixing slowly until blended.
Turn the dough out of the bowl and divide in half. Place between 2 pieces of parchment or waxed paper. Roll into a 10 by 12 by 1/4 inch rectangle. Refrigerate until firm, about 2 hours or overnight.
Take out one of the chocolate doughs and brush the top lightly with cold water. Place the vanilla dough carefully on top and lightly press to smooth and seal the doughs together. Trim the edges if needed. Brush the surface of the dough lightly with cold water. With the long edge facing you, roll into a tight cylinder. Position the sandwiched doughs with the long edge facing you. Using the edge of the paper as a guide, roll the doughs into a tight cylinder.
Wrap in plastic and refrigerate for 1 hour. Repeat with remaining 2 sheets of dough.
Slice the dough into 1/4-inch thick cookies. Bake on parchment-lined baking sheets at 325 F until just golden - about 14 to 16 minutes.
Wednesday, June 17, 2009
Raspberry Cupcakes with Vanilla Frosting
I'm not really one for creating my own recipes - I prefer to follow the instructions of others, tweaking things here and there - usually if I've run out of the proper ingredients, but still.
But I thought I would make an attempt at creating my own raspberry cupcakes.
 Well, creating might be a strong word, since I really just took a basic cupcake recipe, and mixed in some melted seedless raspberry jam (recipe at the end of the post).
I mixed up the cupcake batter in my mixer (yes, I finally used it since the move!), and stuck the jam in the microwave until it was pourable.
 Best part of this recipe? Pink batter! I'm not such a pink girl myself, but seeing it in the bowl of my mixer was pretty exciting. I don't usually bake with food colorings, but maybe now I should reconsider.
 After the jam was completely incorporated into the batter, I used a cookie scoop to fill the cupcake liners. I put about two scoops into every cup. Not that they were each even.
 It made 24 cupcakes, which unfortunately I had to bake them separately in my teeny oven. And lengthways. But I'm not complaining.
 They baked up decidedly less pink, but still cute. And almost all even. Score one for the cookie scoop.
 After this, I didn't quite have the time to make my own frosting, so I went with the store-bought stuff from a can. Not great, but not bad either. Plus I like having it around afterward to eat with honey-wheat pretzels.
But wait. Why did I pick cupcakes to make, this auspicious evening?
Because of this:
 That's right, I am now the proud owner of a Chefmate 24-count cupcake carrier. Heaven.
The bottom layer is an actual muffin pan, and on top is balanced a plastic tray that is locked into place when you snap the dome lid on top.
Here are the last two cupcakes in my new favorite toy. I see alot more cupcakes and muffins in my future.
 Anyway, back to the cupcakes. When they initially came out, I thought the texture was a bit strange - a little sticky - but the taste was good. After my second cupcake though, it was growing on me and by my last, I was a big fan.
They were a little heavier than normal cupcakes, but the taste was sweet and satisfying.
Tip of the Day: Make sure to purchase large, not small, medium or jumbo eggs for baking. Most recipes, unless otherwise specified, are calibrated for that size.
Recipe:
2 cups flour
1.5 cups sugar
2.5 tsp baking powder
1 tsp salt
1/2 cup shortening, softened
3/4 cup milk
1 tbsp vanilla
2 eggs
1 1/4 cups raspberry jam
Mix the flour, sugar, baking powder and salt in the bowl of a stand mixer.
Beat in shortening, milk, vanilla and eggs.
Heat the jam in the microwave until it is pourable.
Gradually mix into the batter until it is imperceptible.
Pour batter evenly into 24 muffins cups.
Bake at 350 F for 22 to 24 minutes.
Subscribe to:
Posts (Atom)