Sunday, April 25, 2010

To Babke and Bust

I haven't had a total kitchen meltdown for a while now. Which means either I'm getting better or I'm not being very adventurous. Presumably the latter. But this latest endeavor falls squarely in the "mistaking" category. A failed, hard-as-a-rock, completely inedible babke - chocolate yeast cake.
This disaster actually happened a couple months ago, for my mother's birthday, but like many things (books, shoes, furniture) it got lost in the post tree shuffle. The fact that this was for an "occasion" makes the failure even more acute.

I have a healthy fear of yeast. And by healthy fear I mean I cower in the corner shivering when asked to bake with it. It's scary. It's alive. And sometimes, it doesn't work. The instructions for this recipe require the yeast to be mixed with warm water and left for ten minutes, when bubbles should form. How many bubbles? What size bubbles? How close together are the bubbles? Bubbles bubbles?
Sorry, where was I? Right, yeast. Well, I don't know if the yeast was the problem here, or I over kneaded, or under kneaded, or didn't roll it out well enough, or any combination of the above, but this was totally inedible. And I had a hunch it wasn't going to turn out well earlier. But stupidly, as usual, I persevered. And was not rewarded. Seriously, it was impossible to even saw through this thing.
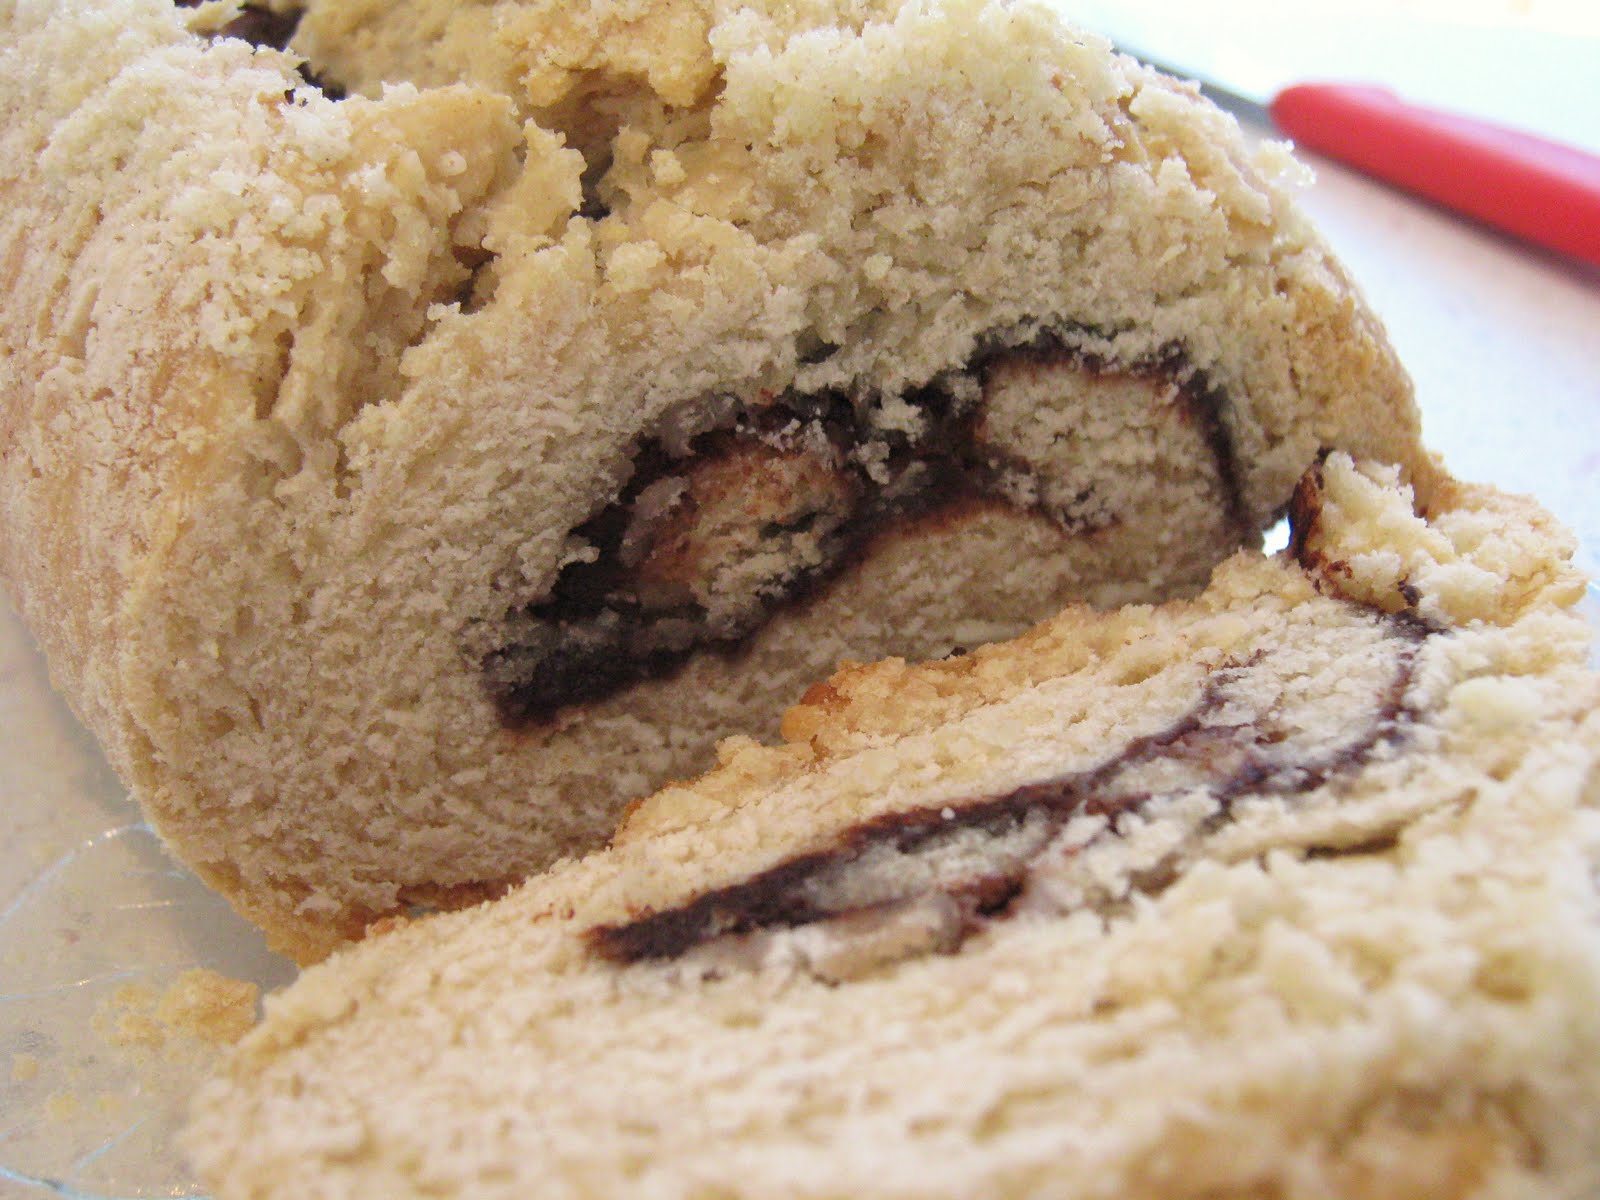
What was even worse was that the recipe made two! Luckily, this was not the only dessert in the making for my mother's birthday weekend, and I had a trusty Dorie Greenspan recipe also on hand that delivered, as usual. But more on that later!
Since this happened I have been too afraid to try babke again, but there is a Smitten Kitchen recipe I have my eye on that may be in my future. Maybe.

Tip of the Day: Know when to give up. And don't use old yeast! It only has a shelf life of 3 to 4 months.

Tuesday, April 20, 2010

Better Than Cake

No recipe today - but something completely adorable instead. See, my friend Sarah was very excited to present me with a gift last week. I had no idea what it was, and I was assured only that it was "personalized."

Turns out that Sarah's mom, Elyse, has a hidden talent: apron making!
[Special thanks to Sarah for volunteering to model said apron.]
Sarah picked out the fabric - blue decorated with slices of cake and pie, and the accent fabric - colored sprinkles on a pink background.
But it get's better - my name is adorably embroidered in pink at the top...

And Baking and Mistaking is stitched into the contrasting pocket! Amazing!
Not to mention the flouncy skirt, and all around cuteness. I think it might be too cute to get dirty. It's definitely nicer than most of my clothes!

Next up on Baking and Mistaking...a total disaster, coming your way this week.

Tuesday, April 13, 2010

The Most Extraordinary French Lemon Cream Tart

I never seem to have much success when it comes to food and thermometers. Though nothing quite tops the shattering of the glass tip of the candy thermometer while whipping my 7 minute frosting, I still was nervous when I used a (new) thermometer to fry doughnuts, and I watched as the temperature dipped up and down throughout the process, resulting in some doughnuts that were browner than others.

I can also never get the thermometer to stand upright in whatever bowl or pot I am using - it tends to slide around and fall over, resulting in a few choice words occasionally heard in the kitchen. Another problem with the thermometer is that it is often not a one person job. Though I prefer to cook in an empty kitchen, I often find myself yelling for help as I attempt to keep the thermometer up, hold the bowl steady, whisk, read the thermometer and check the consistency of the cream. It's enough to make you break a sweat.

So when I attempted The Most Extraordinary French Lemon Cream Tart (her title) from Dorie Greenspan I was nervous. And with good reason. Ultimately, with major bumps and hurdles, I got an extraordinary tart.
The recipe is actually quite simple - the tart dough comes together quickly, requires no rolling out, and easily presses into a pan.
The lemon curd filling - though made of only 5 ingredients - is where the tricky part comes in.
The instructions (below) state that the mixture must come to 180 degrees F. Additionally, the book wrote, "Getting to temperature can take as long as 10 minutes." Well, after over 15 minutes of whisking and temperature checking and knocking over the thermometer and calling for help and forgetting to whisk and almost knocking over the bowl, while only reaching about 160 F, I gave up. The mixture had thickened considerably and I assumed there was no hope for me to reach 180 F, and instead I crossed my fingers and hoped for the best.
But this was a dessert I made for my family and then left for the weekend, so I wasn't even around to see if it held up. I left my mother with strict instructions to only reveal to our guests that I had made it if it cut into neat slices. So I arrived home to find the remnants of the tart in the fridge, neat edges all around, and I assumed success.

I assumed wrong. Apparently when eaten Friday night the filling oozed all over the place with every slice, but by Saturday it had set completely - and even turned a darker (somewhat strange - thought not as strange as this picture appears) shade of yellow.
Either way - messy or neat - it was incredibly delicious - the lemon filling was completely addictive, and I had trouble restraining myself from eating it by the spoonful before it made it into the shell, instead contenting myself with licking the bowl clean.
Tip of the Day: Don't be afraid to recruit helpers in the kitchen when necessary (nor to kick them out when they prove unhelpful). If you must go at it alone - keep duct tape on hand to hold things in place you cannot!

Recipe: (from Baking: From My Home to Yours by Dorie Greenspan)
Note: this recipe requires hours of refrigeration and freezing time, so plan accordingly.

Filling:
1 cup sugar
zest of 3 lemons
4 eggs
1/2 cup fresh lemon juice (from 4-5 lemons)
2 sticks plus 5 tablespoons butter or margarine, softened

Crust:
1 1/2 cups flour
1/2 cup confectioners/icing sugar
1/4 tsp salt
1 stick plus 1 tbsp (9 tablespoons) frozen butter or margarine
1 egg yolk

Supplies:
heatproof bowl
pot
thermometer
food processor/blender

For the filling:
Mix the sugar and zest together with your fingers until it is moist and grainy.
Add in the eggs and lemon juice and whisk until combined.
Bring a few inches of water to boil in a saucepan and set the bowl containing the mixture on top.
Whisking constantly, cook until the thermometer reads 180 degrees. It should thicken and begin to leave tracks.
As soon as it hits 180 F, remove from heat and strain into the container of the food processor or blender. Let it stand there, stirring occasionally, until it reaches 140 F, about 10 minutes.
Turn the machine on high, and as it works add the softened butter in tablespoons, about 3 or 4 at a time. Continue until all the butter is added, and then continue to blend for another 3 minutes.

Pour the finished cream into a container, cover tightly with plastic wrap (pressed against the surface) and refrigerate at least 4 hours or overnight.

For the crust:

Put the flour, sugar and salt in the bowl of a food processor. Pulse to combine.
Scatter pieces of the frozen butter over the dry ingredients and pulse until the butter is cut in.
Break up the yolk and add it a little at a time, pulsing after each addition.
After it's all in, process in long pulses - 1o seconds at a time, until dough comes together.
Turn out of the bowl and knead any uncombined ingredients - but sparingly.
Press the dough into a oiled 9-inch tart pan. Make sure to press it up the sides of the pan.
Freeze the crust for an hour.
When frozen, tightly press an oiled piece of aluminum foil on top of the tart, and bake at 375 F for 25 minutes.
Remove the foil, and bake for an additional 8 minutes until firm and golden brown.
When crust is completely cooled, and the lemon cream has been refrigerated for at least 4 hours, spoon the filling into the shell and serve.

Friday, April 9, 2010

Chipster Topped Brownies

A couple months ago I purchased by very first Dorie Greenspan cookbook. "Baking: From My Home to Yours" is an enormous tome, too heavy to cart around but too exciting to leave behind. Since I received it I've been busy trying out several things, but I haven't shared any with you yet. Allow these Chipster Topped Brownies to be the first of many.

I've actually made a similar recipe to these, but they were judged on the dry side, and never repeated. 
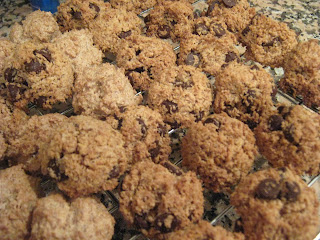
But these? Nobody could ever call these dry. These and rich, decadent, soft and chewy. One bite is enough for a chocolate coma, but still, you persist.

The amount of chocolate in both of the batters is truly incredible. Never again do you have to choose between brownie and blondie.


Tip of the Day: You can play around with the chocolate you use in this recipe - I stuck to semisweet, but you can use unsweetened, bittersweet, even milk chocolate chips in the top layer if you desire.

Recipe: (adapted from Dorie Greenspan's Baking: from My Home to Yours)

For the brownie layer:
9 ounces semisweet chocolate, coarsely chopped
2 sticks (8 ounces) butter or margarine
1 2/3 cups sugar
4 eggs
½ tsp salt
½ tsp vanilla
1 cup flour

For the cookie layer:
1 ¼ cups flour
½ tsp baking soda
½ tsp salt
1 ½ sticks (12 tablespoons) butter or magarine, softened
¾ cup packed light brown sugar
2/3 cup sugar
1 egg
1 egg yolk
1 tsp vanilla
1 cup semisweet or bittersweet chocolate chips or chunks

Brownie layer: Melt the chocolate and butter together, stirring until melted and combined.

Beat the sugar and eggs together until pale and creamy. Add in the salt and vanilla.

On low speed, pour in the chocolate mixture, mixing until combined.

Add the flour, mix until no white streaks remain. Pour batter in to a greased and lined 9x13" pan and set aside.

Cookie dough: Beat the butter and sugars together until smooth and creamy.

Add in the egg, and then the egg yolk, beating between additions. Beat in the vanilla.

Pour in the flour, baking soda and salt and mix until just combined.

Stir in the chocolate chips. Drop the dough by spoonfuls over the brownie batter, and gently spread evenly.

Bake on 350 F for 50 to 55 minutes. Cool in the pan.

Wednesday, April 7, 2010

You get an Apple Pie!

Ah, the joys of baking with flour. Well, truth is I'm about to embark on a collection of recipes that I made pre-Passover, pre-tree, pre-stress. Well not really pre-stress. But you get the idea.
I have a handful of desserts that I have yet to share with you, but that's about to change.

Let's get started: everybody gets an apple pie!
Longtime readers may remember that I tried this way back in the dark ages - with canned pie filling and horrible photos. But now I'm at it again - this time with delicious (if I do say so myself) photos and homemade filling. But I start the same way: with store bought mini pie crusts.
They are so adorable, and really not too expensive (they come in a pack of 6) that I simply can't resist. And why should I? (You can also find mini frozen pie dough crusts in most supermarkets.)

I filled each crust with the pie filling, and topping with a crumb crust. I was a little nervous about the crust before, since I've had some bad experiences with apple pies and crumb crusts before.
But my fears were unfounded, and they all came out of the oven crispy and delicious looking. I'm getting hungry as I type.
Well not all of them actually - I ran out of crust for the 12th pie, so I just sprinkled a little brown sugar on top and stuck it in with the rest.
Since it obviously isn't fit for company, I got to eat it right out of the oven. Too bad.

These pies were to bring to my friend Rachel's apartment for a meal. Which ended up being in the back of the cab during Snowpocalypse 2010. I'm sure everyone appreciated the effort.

Tip of the Day: If you're looking for a really quick dessert that still looks like you put in effort - fill each mini pie crust with sliced strawberries and top with whipped cream.

Recipe:
Mini Apple Pies

12 mini graham cracker crusts (mine are Keebler)
1 egg yolk
3 golden delicious apples, cored and diced
1/2 cup sugar
1 tbsp flour
1/2 tbsp cinnamon
1/4 cup lemon juice
1/4 cup butter, melted
1/2 cup flour
1/4 cup sugar
1/4 cup brown sugar
1 teaspoon cinnamon

Lay the crusts out on a baking sheet. Beat the egg, and brush the crusts with it.
Bake at 375 F for 5 minutes. Remove from the oven and let cool.
Stir together the apples, sugar, flour, cinnamon and lemon juice.
Let sit 20 minutes in the fridge. (Can skip this step)
Divide apples evenly among crusts.
Beat together the butter, flour, sugar, brown sugar and cinnamon, until crumbly.
Add in more flour if needed. Crumble over apples.
Bake at 375 F for 30 to 35 minutes or until golden brown.

Friday, April 2, 2010

Carrot Muffins: Passover and Not

A few weeks ago I made some carrot muffins for a meal I hosted in my apartment. They were a hit. Today I thought I could try them out for Passover - substituting a combination of matzah meal and potato starch for the flour. They were...interesting.

The ones with flour were cute and delicious - moist without being too heavy, and just enough carrots that you felt they may have some redeeming nutritional value aside from being cake.
They were smaller than I thought - the recipe called for 18, but I could certainly make 12 or 14 slightly larger ones, and adjust the baking time.
The ones without were not so cute, and definitely not as delicious. But they weren't bad. They were not so cute because they didn't spread at all, or even out, so they had funny, lumpy shapes.
They weren't as delicious, because, well, let's face it - they weren't made with flour. I definitely wouldn't say they were bad. - quite decent for Passover muffins - maybe could do with an upping of the sugar or cinnamon content, but overall pretty OK. I know, a resounding compliment.
In addition to having to substitute the flour, my baking powder was a special Passover mix made with potato starch instead of corn starch. I also had a problem with the milk. Normally I use soy milk to keep my baked goods dairy free. Soy is one of those things that Ashkenazi (of Eastern European descent) Jews cannot have on Passover, and I couldn't find any coconut milk. So I used orange juice. And I used about an extra 1/4 cup to add some moistness.
Anyway - if I have to pick which one was better, obviously the flour-based version wins by a landslide. But the Passover ones are pretty good for what I have to work with.

Tip of the Day: In this recipe - and in all - I measured the oil out first in the 1/2 cup, then the honey, which enabled the honey to slide right out.

Recipe: (adapted from RecipeZaar)
1 1/2 cups flour (OR 1 cup cake meal plus 1/2 cup potato starch)
1 tsp baking soda
1 tsp baking powder
1 tsp cinnamon
pinch of salt
1/3 cup oil
1 egg
1/3 cup honey
1/2 cup milk (OR soy milk or coconut milk or orange juice)
1/2 tsp vanilla
1 1/2 cups grated carrots

Mix together the dry ingredients - flour, baking soda, baking powder, cinnamon and salt.
Make a well in the center and add in the wet ingredients - oil, egg, honey, milk, vanilla and carrots.
Stir together until all ingredients are moistened.
Divide among 14 to 18 muffin cups and bake on 400 F for approximately 15 minutes.

Thursday, April 1, 2010

Chocolate Chip Coconut Macaroons

I'm baaaaaaaackkkkkkk. 

Hole in my house withstanding, I am in the kitchen, matzah flying, with Passover treats finally coming out of the oven. 

As I mentioned last week, I am a lover of the canned, dense Manischewitz macaroons. But I knew I could do better. And I did. 

These macaroons start with my favorite scent - toasted coconut. Seriously, this stuff makes the whole kitchen smell amazing. I would make it for this purpose alone. 

Anyway the whole recipe is insanely easy - just the egg whites and sugar and coconut - plus the chocolate chips if you want - they're not mandatory. Or you could sub in chopped nuts, dried fruit, whatever you desire. 

You just beat up the egg whites and sugar, dump the coconut on top and mix it in. 

These are crispy on the outside, but still moist on the inside and every coconut lover's dream. 

Tip of the Day: If you need sweetened coconut and can only find unsweetened - do not despair. Up the sugar content of the recipe as needed - estimate 1/2 cup for every 12 ounces coconut. 

Recipe: 

Chocolate Chip Coconut Macaroons (adapted from Joy the Baker)

12 ounces coconut (mine was dessicated - you can ground shredded or leave it as is)

4 egg whites

pinch of salt

1/2 to 1 cup sugar

1 cup chocolate chips

Note: If you're using sweetened coconut - keep the sugar at 1/2 cup, if not, up it as you desire, I used about 1 cup total. 

Spread the coconut out on a rimmed baking sheet, and toast on 350 F, checking every five minutes, until most of the coconut in browned. Let cool. 

Beat the egg whites and salt until they begin to stiffen. Gradually add in the sugar, until egg whites are stiff and shiny. Fold in the coconut and chocolate chips. 

Drop by tablespoonful (I formed mine in the bowl of a tbsp measurement) on to parchment paper lined baking sheets. Bake on 350 F for 10 to 15 minutes, until golden brown.

Makes about 50 cookies.